Friday, April 6, 2012

Madam Hooch master post


So much of the early days of this blog were dedicated to my Madam Hooch costume. You may be wondering what came of it. To be honest, as I got deeper and deeper into the project, I was mostly worried about finishing it on time and didn't take a whole lot of pictures of the construction. But here's a couple of finished product photos:


I'm fairly happy with the way it turned out. I threw the pants together like the week before Halloween and they were a little big in the waist so they kept slipping down. Also, the robe was too billowy. If I'd had the time and patience, I'd have opened it back up and taken in the back and side seams to remove like 10-20 inches. But those are things that only I would notice. Everyone else (who actually knew who I was dressed as) had nothing but complements.

Also, I made some tasty bloody cupcakes (and I don't mean that like the British cuss word). I mean this:
They were gross looking and very tasty--I was quite proud of them.

Long time no blog...


Well, if I've learned one thing about myself in the last 6 months, it's that I'm terrible at keeping up with a blog. Which is a shame because the last six months have been pivotal in for both my personal and professional development. Not to mention I had some darn good fun! I'll try to fill in the blanks for you a bit. So first of all, I Love a Piano was a blast. I had Irving Berlin stuck in my head for--actually, come to think of it, I still have Irving Berlin music stuck in my head. Here's what the show looked like:
Cute, right? It was good old-fashioned fun. Sort of 40s/50s inspired with a modern twist. The costumes were mostly bought and altered. My favorite part of this show was that I got to do hair for almost all the girls. It was all about twists and curls and (sort-of) victory rolls. And I had so much fun!

After I Love a Piano was over and done with, I took a trip to California to visit the Make-up Designory (or MUD, as we affectionately refer to it)--which I was interested in attending. I saw the school, checked out apartments, and pretty much made the decision that I was Los Angeles-bound. Of course, that makes it sound as if it was an easy decision. It wasn't, I assure you. I was getting rather comfy in Indianapolis--I had good friends nearby and fairly steady work coming in. But I couldn't shake the feeling that I wasn't where I was supposed to be. And so I made the decision to stop wishin' and hopin' and chase down my dreams. So I set a departure date (March 1st) and I started scheming.

But before any schemes could come to fruition, I had lots of business to attend to in Indianapolis. Including, but not limited to, finishing my Halloween costume!

Monday, August 22, 2011

Another year, another season.

Well, friends, it's that time of year again: time for the school where I work to begin a new year. The students are back for rehearsals and classes start a week from today. That means it's time to get cracking on the big Fall musical. This year, we're doing a show called I Love a Piano, a tribute to the music of Irving Berlin. Now, it just so happens that I'm quite fond of Irving, so I'm pretty excited about the show. Although, I will miss doing a show with a plot and characters and all that business.

I won't be designing this production--I'll be running the costume shop. And if you're not sure about the distinction there, I'll explain. (And if you are, you can just zone out for this next paragraph.) A costume designer makes the decisions about what each person will be wearing. They do design drawings, pick out fabrics and accessories, and make the first and final call about the look of the costumes in a show. The costume shop manager is in charge of actualizing the costumes. In a bigger shop, that might mean overseeing a team of drapers (who make patterns), first-hands (who cut the fabric), and stitchers (this one should be obvious). But in my little shop, it means sewing, sewing, sewing. (The designer does quite a bit of sewing here as well.) And I also get to train a small force of students in the ways of the costume.

But all that lies ahead. Before we dive into all of that business, we need to take some publicity photos that will become the poster we use to advertise the show. You may be thinking, how can you take the photos if you don't have the costumes yet?! And the answer is: easily. We just use stock costumes that imply the atmosphere of the show. And that's what we'll be doing today. And it's the first of many things to come for this show...

Friday, August 12, 2011

Animal Hat Vogue

All my embroidery is done! And I'm putting the bias tape around the edges of my Quidditch pads. I don't have anything more interesting than that to report at the moment. But enjoy this:


Sunday, August 7, 2011

Progress...

Well, I've finished the embroidery on the arm guards and have pinned the bias tape around the edges:

Which is great--they're progressing along nicely. Though there's still a lot of detailing that I have to do with snaps and straps. What I'd like to do is make elastic straps to hold them into place and then make pleather faux straps with non-functioning buckles to hide the elastic. It's that kind of detail work that isn't necessary but makes me happy nevertheless. Also I found some perfect (size and color and style) buckles at JoAnn, but they didn't have as many as I needed. So...yeah.

I've also finished making the vest--though it needs a few alterations. I started with this men's vest pattern (which I conveniently already owned), made a mock-up of half of it, did a couple of alterations on the pattern and then put the vest together. The outside fabric is the same fabric I'm using for my robes--which is black crepe-back satin, except I'm using the matte side instead of the shiny side--and the vest lining is a black satin brocade (on the front) and a white dupioni silk (on the back) both of which came from my fabric storage. Here's a progress shot:
Finished, the vest didn't fit quite as perfectly as I wanted it to--forcing a men's vest to fit an hourglass figure is tricky business. So I pinned some alterations into place that made it lay right. Just to be sure (because the vest needs to be have a really nice tailored look) I'm going to baste the alterations into place (i.e. I'm going to hand-sew them loosely and take the pins out before I make the final machine sewn alterations) and then finish the whole shebang. I also have to put a faux welt pocket on it. And buttons. But here's a shot of the vest thus far with pinned-in alterations as modeled by my dress form, Sugar:

I also really like the look and weight of the dupioni silk lining on the vest. I may use a white dupioni to line the robe as well. I thought it would be too shiny but I think I was mistaken. And I'm a sucker for silk. But, then, who isn't?

Thursday, August 4, 2011

Tuesday, August 2, 2011

Great, kid! Don't get cocky!

I'm not going to lie to you, blog. I'm pretty proud of myself right now. I'm about halfway through making the Quidditch pads for my Halloween costume and it's going so much smoother than I expected (I almost hate to say that, but I really hate to not update about them.) So bear with me for a moment whilst I brag about my successes before project completion (I'm sure I'll be back before you know it to tell you how things took a sudden turn for the worse.)

As usual, I started by looking at stills of the movie and figuring out the shapes. Then, truly, I just took a piece of printer-paper, held it up to my arm, and drew the approximate shape with a Sharpie. Then I cut it out, held it to my arm, and reshaped it until it was perfect. I did the same with the shin guards, though those were much easier shapes. Here be the finished patterns:
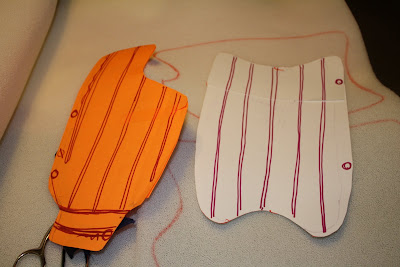

At this point, I used all the knowledge I've obtained over years of doing overhire stitcher work for a mascot costume company. I knew that to give the pads the 3D sculptural look they needed, I was going to have to sew foam into them. Easy enough in theory, but I'd never done it on my domestic sewing machine before (only on the mascot company's powerful industrial machines). Nevertheless, I was going to give it a shot. I cut the shapes (without seam allowance) from 1/2 inch filter foam, then cut a piece of leather-look pleather for the outside and white linen-y fabric for the inside. (These I cut with quite a bit of seam allowance--maybe 2"?) I pinned it all together using as few pins as possible (so there wouldn't be dimples in the pleather, which can be such an unforgiving fabric), swore a prayer to the sewing gods and used a zig-zag stitch to sew around the edges. AND IT WORKED!! (albeit, slowly). So now I had this:
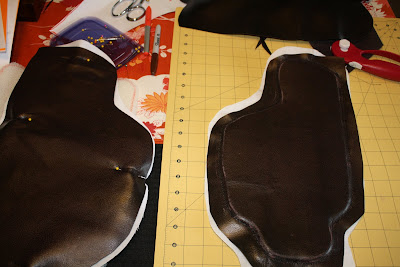

To get the rugby-pad shaping that the Quidditch pads require, I had to do several rows of stitching. I drew the lines on the backside of the pads with a Sharpie and a ruler and set about doing a small-ish zig-zag stitch along them. In retrospect, I would have made the back sides prettier, but those will be very hard to see, so I'm not going to worry too hard about it. Once that was complete, I had this:
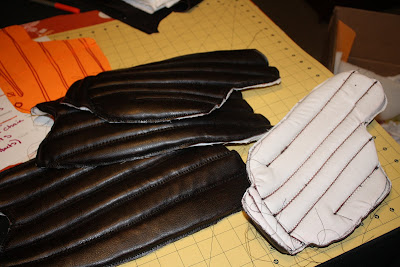
They look pretty good (if I may say so), and would be very nearly done if I was making the standard Quidditch pads. But Madam Hooch's pads have rows of decorative grey stitching in each of those little trenches. So that's what I'm working on now. I have to hand-stitch each row with embroidery floss. It's slow-going, partly because I'm slow at embroidery (it's not a skill I break out often, and so I'm not great at it) and partly because it's very hard on the hands to sew through the foam and pleather. But I've been re-watching old episodes of Futurama while I work on it, so at least I'm entertained. When that step is done, I'll post pics.

But in the mean time, let's all just revel in that fact that my humble little sewing machine can chew through 1/2" foam like a pro! I know I'm celebrating...